|
How to Display a Date in a PxPlus Multi-Line from a NOMADS .NET Calendar |
Starting with PxPlus 2025, a .NET Interface was added to PxPlus that enables the creation of .NET objects in your application.
.NET External controls can also be incorporated into NOMADS panel functionality without creating them as External controls directly on the panel.
For this example, you will be adding a .NET Calendar query button to an existing locked NOMADS multi-line control. Selecting a date from the calendar will populate the multi-line with the date selected.
NOMADS Panel Setup
You will first need to create a new NOMADS panel with a multi-line control.
|
1. |
Create a new NOMADS panel. To launch the NOMADS Panel Designer, select the Panel Definition task on the IDE Main Launcher, or open the Library Object Selection window and click the Panel toolbar button or select Objects > Panel Object from the menu bar. For this example, enter the panel name: CalendarDemo |
|
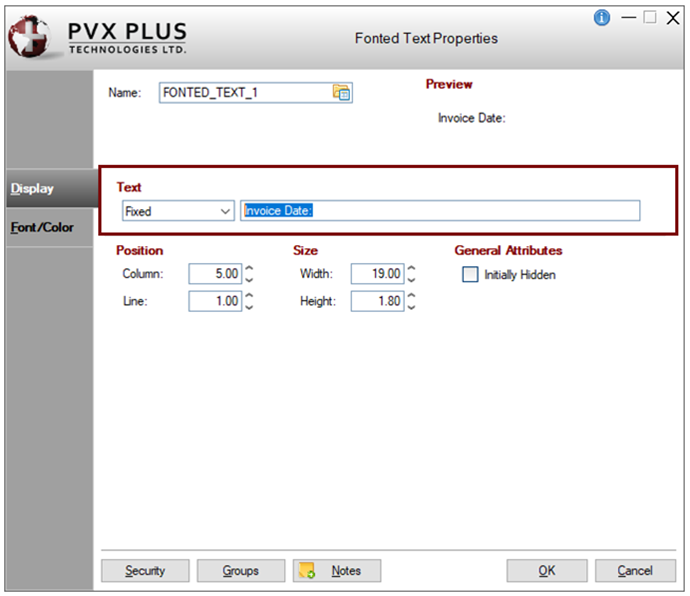
2. |
Create a Fonted Text control at Line 1, Column 5. In the Fonted Text Properties window, in the Text section, leave the drop box as Fixed. In the input field beside the drop box, enter: Invoice Date:
|
|
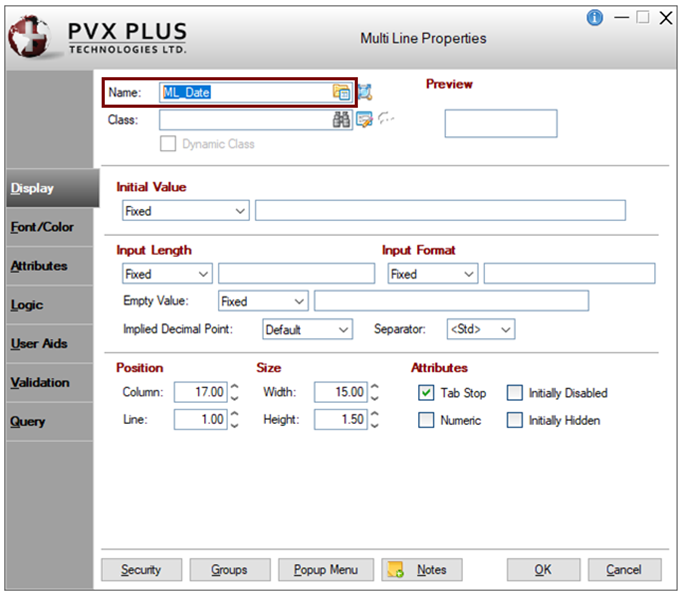
3. |
Create a Multi-line control at Line 1, Column 17 with a Height of 1. In the Multi-Line Properties window, in the Name field, enter: ML_Date
The position of this control becomes important later with respect to the coordinates used when defining the .NET Calendar object. With the multi-line control in this position, the .NET control may be positioned at Line 2, Column 16 so that it displays just below the multi-line. |
|
4. |
Your controls will look similar to the controls below:
|
These steps show you how to add the .NET calendar as an embedded query button to the multi-line control.
|
1. |
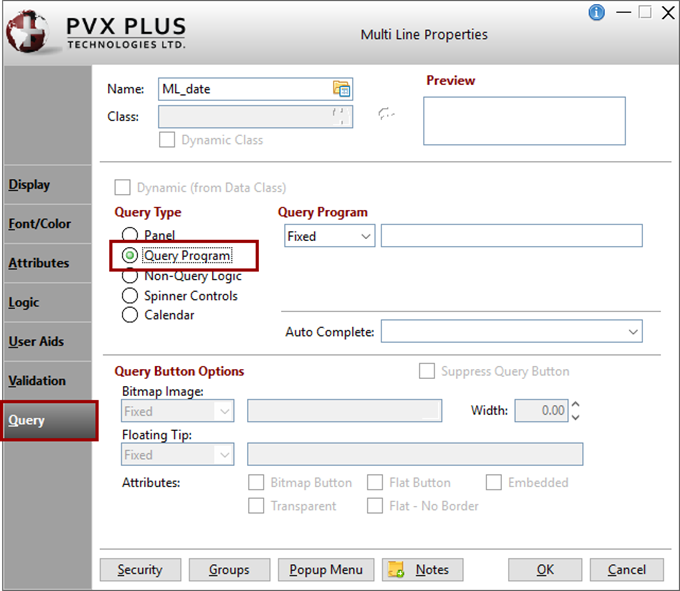
In the NOMADS Panel Designer, double click on the ML_Date multi-line control on the panel to invoke the Multi-Line Properties window. Click the Query tab. In the Query Type section, select the Query Program radio button.
|
|
2. |
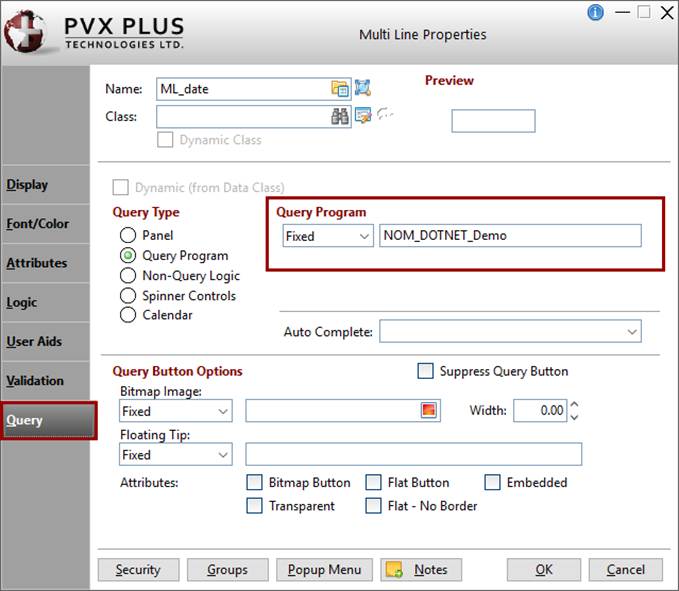
In the Query Program section, leave the drop box set to Fixed. In the input field beside the drop box, enter the program to be run to display the .NET MonthCalendar. For this example, enter the program: NOM_DOTNET_Demo
|
|
3. |
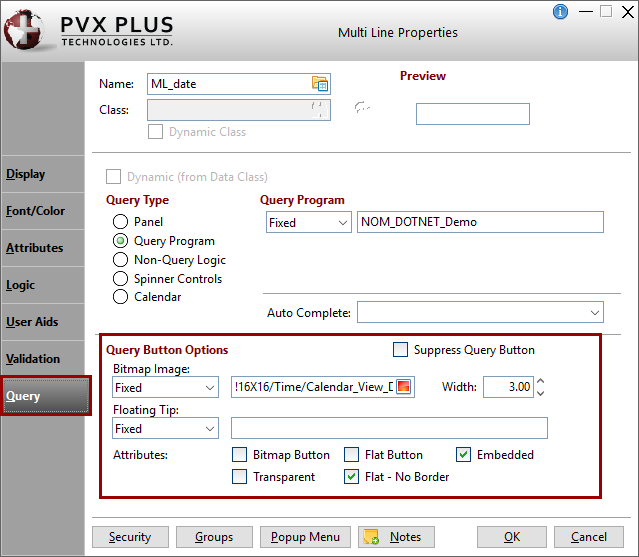
The Query Button Options section automatically becomes enabled after entering the Query Program. In the Query Button Options section, you need to define the query bitmap by assigning a Bitmap Image, defining the Width and selecting some Attributes. For this example, define these options: Bitmap Image: Leave the drop box set to Fixed. In the input field beside the drop box, enter: !16X16/Time/Calendar_View_Day Width: Enter: 3.00 Attributes: Select the Embedded check box and the Flat - No Border check box.
|
|
1. |
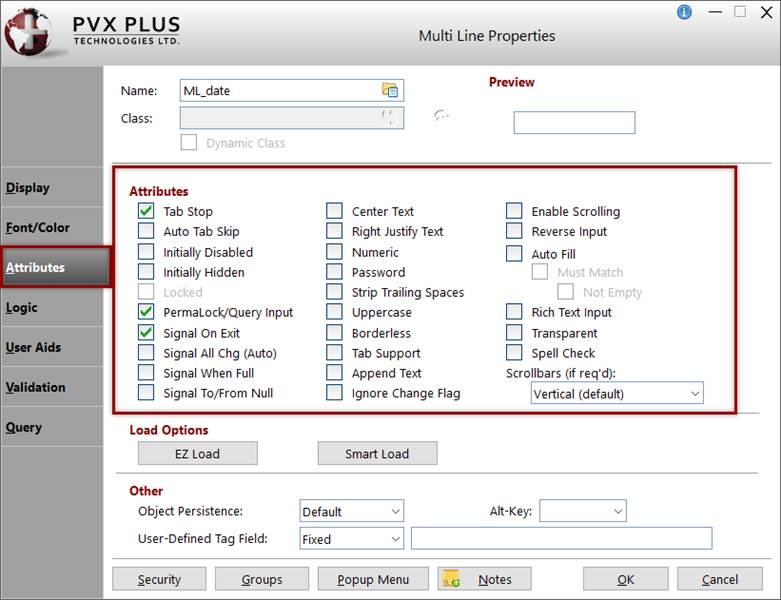
In the Multi-Line Properties window, click the Attributes tab. Select the PermaLock/Query Input check box. Select the Signal On Exit check box.
The PermaLock/Query Input attribute is required if the user will be getting the date from the calendar only without having the option to manually enter a date in the multi-line. This is not required if the date allows for manual entry. The user will not be able to type inside the ML_Date field. The Signal On Exit attribute controls whether a 'Change' signal will be generated when the control is exited, regardless of whether the control's value changes. For this example, the Signal On Exit flag will be set so that when focus leaves the multi-line, the On Change logic is invoked to handle a situation where nothing is selected from the calendar. See How to Remove the Calendar without Making a Selection below. |
|
2. |
Click OK to accept these changes and exit the Multi Line Properties window. |
These steps show you how to create the Query program.
|
1. |
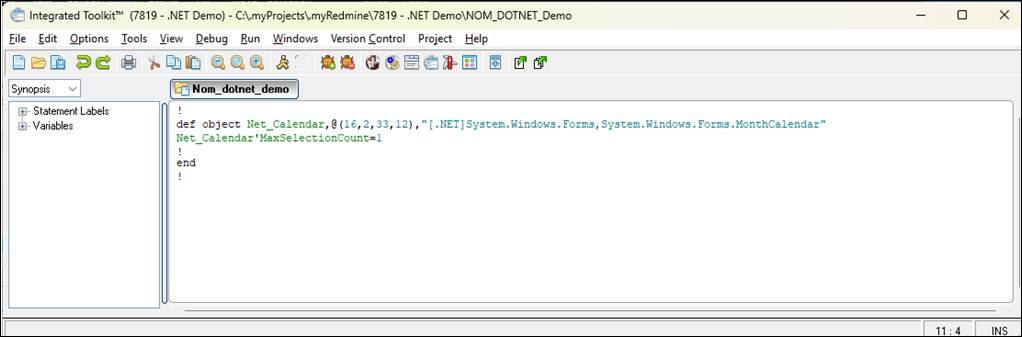
For this example, open the *IT Program Editor from the PxPlus IDE. Create the Query program with this name: NOM_DOTNET_Demo |
|
2. |
To begin, define the calendar object. Syntax: def object Net_Calendar,@(16,2,33,12),"[.NET]System.Windows.Forms,System.Windows.Forms.MonthCalendar" |
|
3. |
To force the maximum number of days that can be selected, set MaxSelectionCount=1. (The default Calendar behavior is to allow a 7-day date range selection.) Add the line of code shown below. Syntax: Net_Calendar'MaxSelectionCount=1 |
|
4. |
Add the END command to end the program.
|
|
5. |
Save this program. |
|
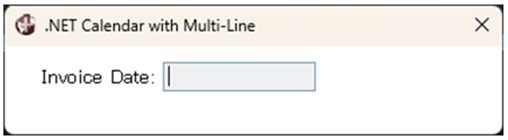
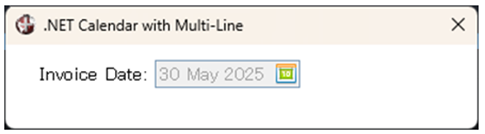
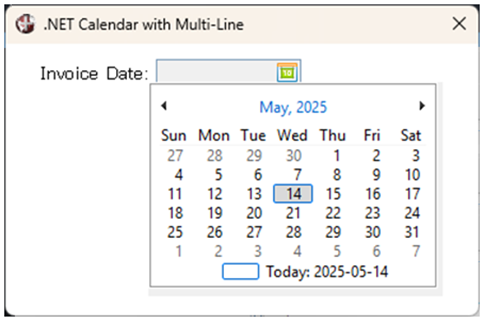
6. |
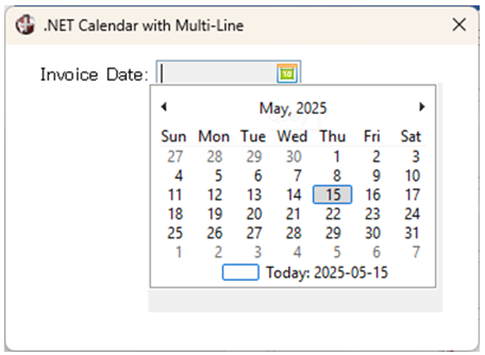
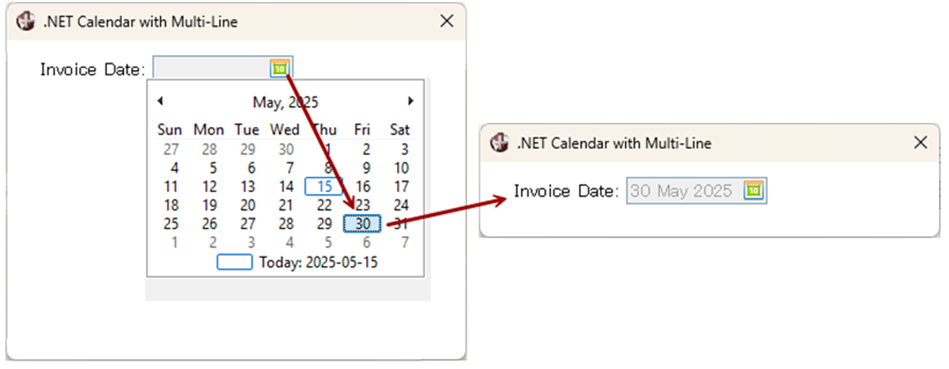
Save and Test the NOMADS panel. Clicking the calendar query button should display a calendar similar to the one below. The current date should be selected. Click the X in the top right corner of the panel to exit Test mode.
|
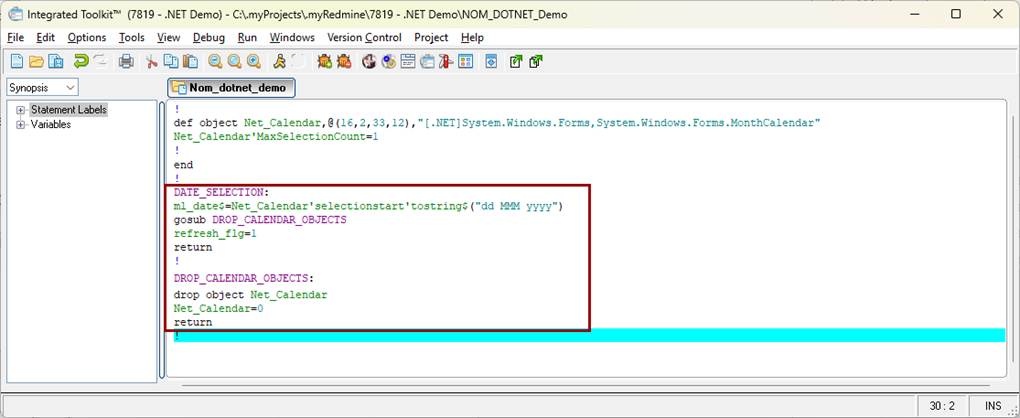
Insert these lines of code in the NOM_DOTNET_Demo program and save the program:
DATE_SELECTION:
ml_date$=net_calendar'selectionstart'tostring$("dd MMM yyyy")
!
gosub DROP_CALENDAR_OBJECTS
refresh_flg=1
return
!
DROP_CALENDAR_OBJECTS:
drop object net_calendar
net_calendar=0
return
!
This CTL value is required when the user selects the date from the calendar. See User-Defined CTLS.
|
1. |
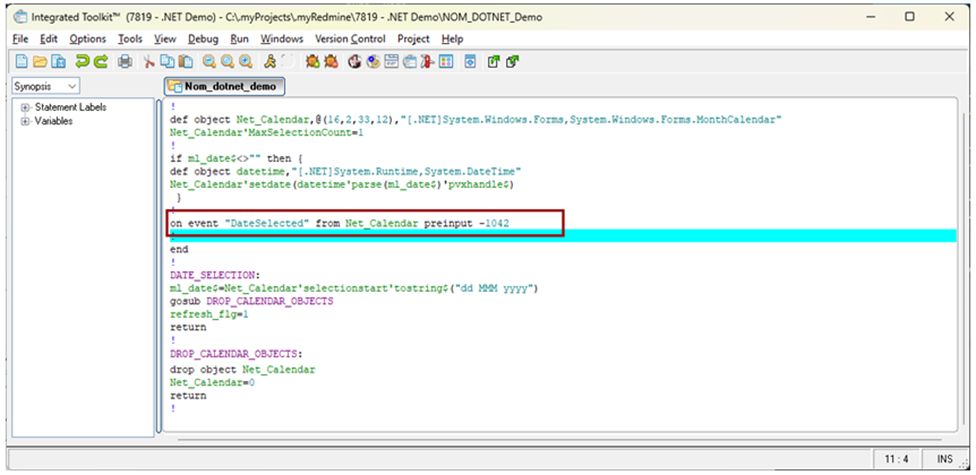
The ON EVENT syntax below places a CTL value into the input queue. Insert this line in the NOM_DOTNET_Demo program after the DEF OBJECT command: on event "DateSelected" from Net_Calendar preinput -1042 |
|
2. |
Save the program in the editor.
|
|
3. |
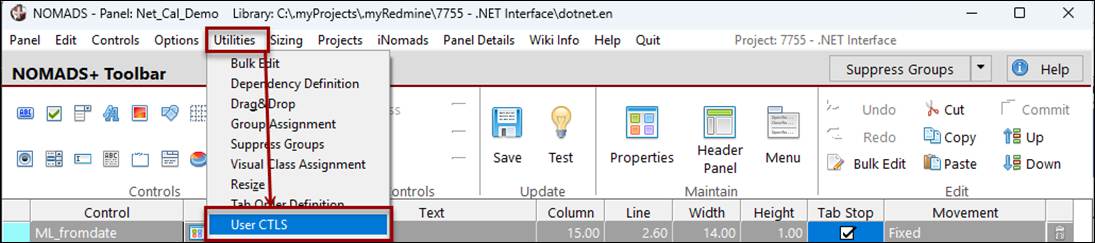
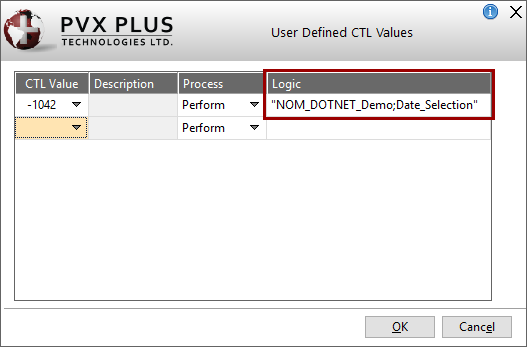
In the NOMADS Panel Designer, open the CalendarDemo panel. Select Utilities > User CTLS from the menu bar.
|
|
4. |
The User Defined CTL Values window opens. Set the CTL value to use when the date is selected from the calendar. This value must be any other value that is not listed in the CTL Value drop box. Enter the CTL Value used for this example: -1042 |
|
5. |
In the Process column, Perform is automatically selected. |
|
6. |
In the Logic column, enter: "NOM_DOTNET_Demo;Date_Selection"
This option results in control being transferred to the Date_Selection method in the NOM_DOTNET_Demo program when a date is selected. |
|
7. |
Click OK to accept this change and exit the User Defined CTL Values window. |
|
8. |
Save and Test the panel. Selecting a date will result in the multi-line displaying the date selected.
|
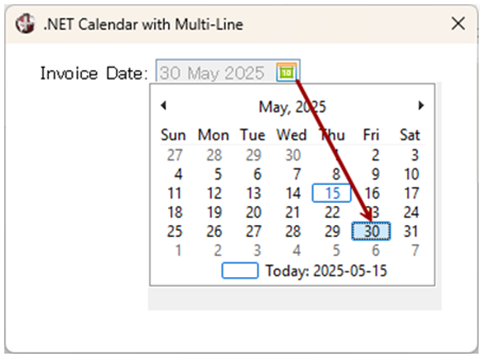
Once a date is selected from the calendar and the multi-line is populated, clicking the calendar query button again should pre-populate the calendar with that date.
|
1. |
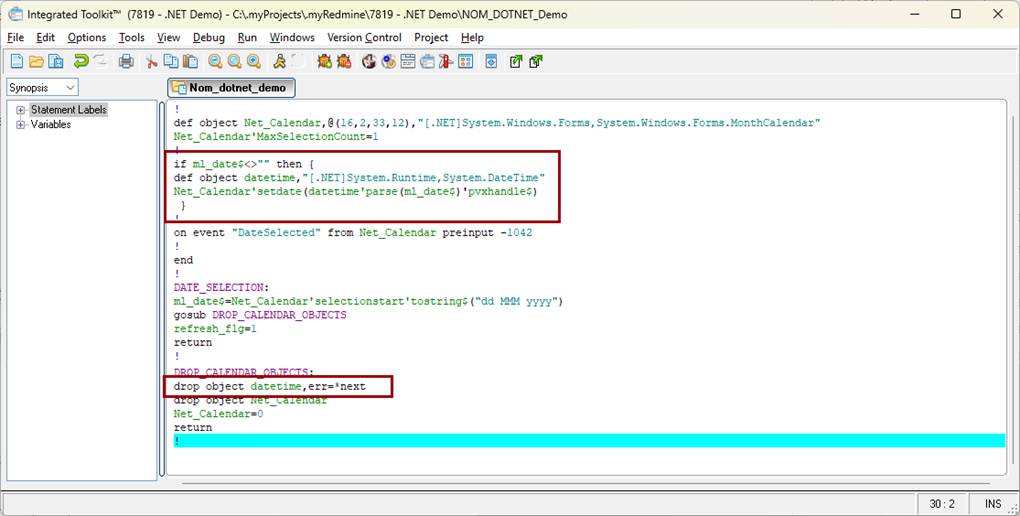
Insert the lines of code shown below immediately after defining the object for MonthCalendar. Insert these lines immediately after the DEF OBJECT command and save the program: if ml_date$<>"" \ |
|
2. |
Insert this line into the DROP_CALENDAR_OBJECTS method and save the program: drop object datetime,err=*next
|
|
3. |
Test the panel. Once an initial date is selected, recalling the calendar should display that date rather than today's date.
|
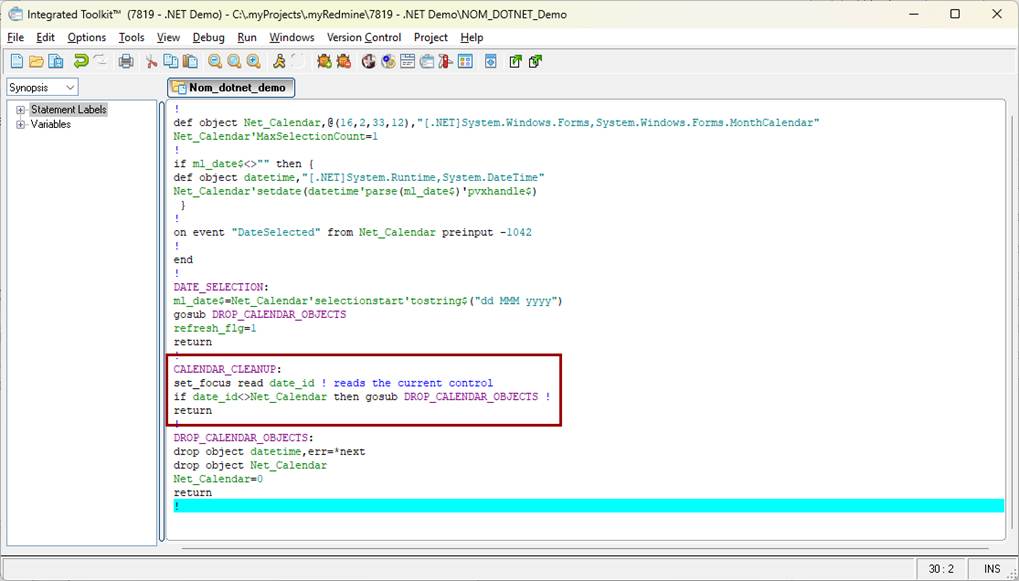
To address the situation where the calendar is displayed and the user clicks outside the calendar, you will be creating a CALENDAR_CLEANUP method.
|
1. |
Insert these lines after the DATE_SELECTION method and save the program in the editor: CALENDAR_CLEANUP:
|
|
2. |
Return to NOMADS to the CalendarDemo panel. |
|
3. |
Double click on the ML_Date multi-line control on this panel to invoke the Multi-Line Properties window. |
|
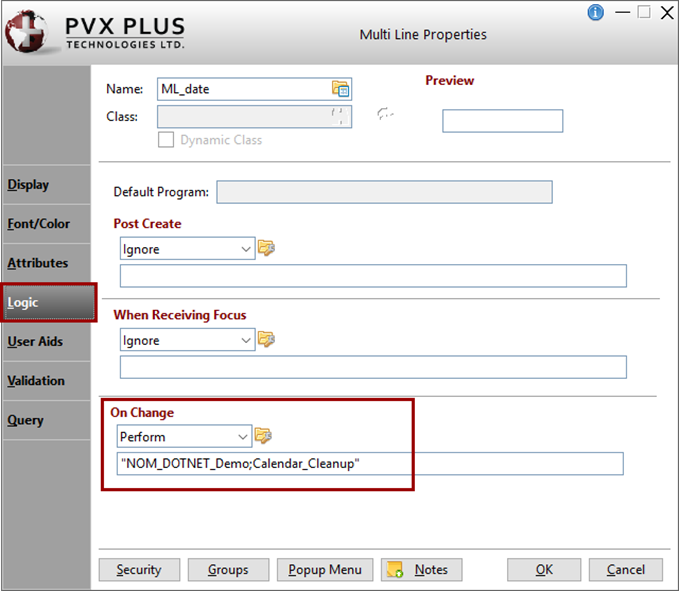
4. |
Click the Logic tab. In the On Change section, select Perform from the drop box. For the method to be performed, enter: "NOM_DOTNET_Demo;Calendar_Cleanup" Because the Signal On Exit check box (on the Attributes tab) has been selected for the ML_Date control, this method will drop the .NET objects associated with the calendar control whenever the user clicks outside of the control/calendar.
|
|
5. |
Save and Test the panel. After clicking the query button, clicking outside the calendar control will also remove the calendar. |
At the end of this tutorial example, you should have a working program similar to the one below:
!
def object net_calendar,@(16,2,33,12),"[.NET]System.Windows.Forms,System.Windows.Forms.MonthCalendar"
net_calendar'maxselectioncount=1
!
if ml_date$<>"" \
then \
{
def object datetime,"[.NET]System.Runtime,System.DateTime"
net_calendar'setdate(datetime'parse(ml_date$)'pvxhandle$)
}
!
on event "DateSelected" from net_calendar preinput -1042
!
end
!
DATE_SELECTION:
ml_date$=net_calendar'selectionstart'tostring$("dd MMM yyyy")
gosub DROP_CALENDAR_OBJECTS
refresh_flg=1
return
!
CALENDAR_CLEANUP:
set_focus read date_id ! reads the current control
if date_id<>net_calendar \
then gosub DROP_CALENDAR_OBJECTS !
return
!
DROP_CALENDAR_OBJECTS:
drop object datetime,err=*next
drop object net_calendar
net_calendar=0
return
!
.NET Interface
How To Tutorials (for .NET Interface)
DEF OBJECT Define Windows Object
ON EVENT Event Processing